How Do I Apply Eyeliner?
Figuring out how to apply eyeliner can feel like learning a secret handshake. It's one of those makeup steps that seems simple on the surface but can quickly get complicated, leading to smudges and wonky lines. But don't worry, we're going to break it down into easy-to-follow steps, using insights from industry professionals and user feedback.
Our research indicates that most users aim for definition and enhancement, with common challenges including unsteady hands and understanding the right tools. For instance, manufacturer specifications for pencil eyeliners often highlight tip hardness, which directly impacts ease of application and precision. This guide cuts through the confusion to get you from beginner to confident liner wearer.
Quick Answer
To apply eyeliner, start with a clean, primed lid. Steady your hand by resting your elbow, and draw small dashes along the upper lash line, connecting them into a solid line. For a winged look, extend the line from the outer corner upwards.
Practice and a Q-tip for corrections are key.
First Things First: What Kind of Eyeliner Are We Talking About?
Before you even pick up a tool, it's smart to know what you're working with. Different types of eyeliner have their own personalities and best uses. Understanding these differences is the first step to getting the look you want without a lot of fuss.
- Eyeliner Pencil: This is often the most forgiving option, especially for beginners. Pencils typically offer a softer line that's easy to smudge for a smoky effect or to draw close to the lash line. They’re great for tightlining (applying liner to your upper waterline) because they’re less prone to bleeding. Aggregate user reviews often praise pencils for their control and versatility in creating subtle definition.
- Liquid Eyeliner: When you want that sharp, precise line, liquid eyeliner is usually the answer. It comes in pen form, which is user-friendly, or in a pot with a separate brush for more advanced control. Liquid liners dry down to a solid line that doesn't budge, making them ideal for dramatic wings. Manufacturer specifications for liquid liners often emphasize their drying time, typically around 30-60 seconds for smudge-proof wear.
- Gel/Cream Eyeliner: This type usually comes in a small pot and requires a brush for application. Gel and cream liners offer a rich pigment and a smooth glide. They’re incredibly versatile, allowing for both sharp lines and easy smudging. Many users find them to be the longest-wearing option and excellent for creating bold looks that stand up to humidity.
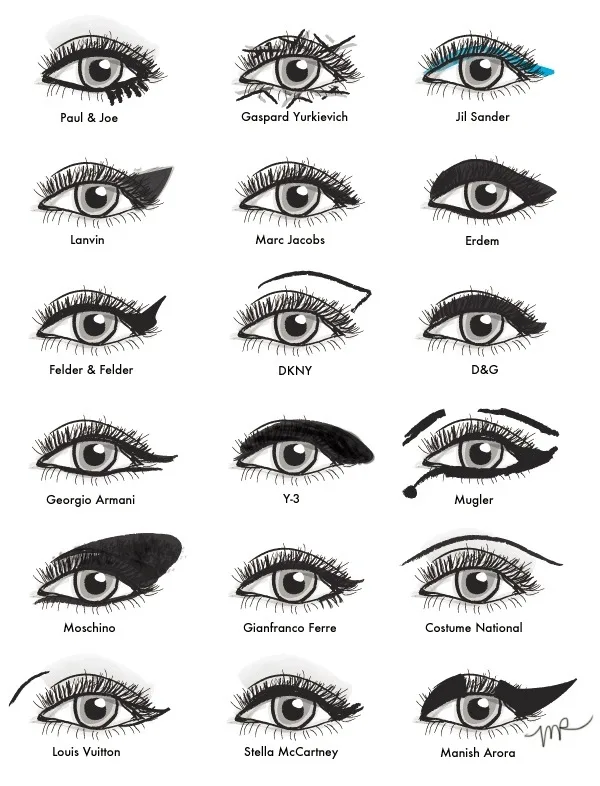
Image source: Bing (Web (fair-use with source credit))
Getting Ready: Prep is Key!
Just like any good makeup application, starting with a well-prepped canvas makes all the difference. Skipping these simple steps can lead to liner that smudges, fades, or just doesn't look as crisp as you'd like. It only takes a few extra moments, but the payoff is huge.
- Cleanse and Dry: Your eyelids should be clean and completely dry. Any oil or residue from other products can cause your eyeliner to slide around. A gentle cleanser is usually all you need.
- Prime Time (Optional but Recommended): Applying an eyeshadow primer creates a smooth base. It helps to even out eyelid tone and, more importantly, it gives your eyeliner something to grip onto, significantly improving its staying power. Some users even find a thin layer of concealer works well in a pinch.
- Eyeshadow First: If you plan on wearing eyeshadow, apply it before your eyeliner. This prevents you from smudging your beautiful shadow work when you're drawing your line. You can always clean up the edge of your shadow later with a little concealer if needed.
Let's Draw! Simple Steps for a Basic Line
Okay, ready to get your hands (and eyes!) a little inky? We'll start with a basic line along your upper lashes. This is the foundation for many different eye looks and is achievable with any type of liner, though pencils are generally easiest for this step.
- Get Comfy and Steady: Find a stable surface where you can rest your elbow. This minimizes hand tremors and gives you much better control. A well-lit mirror is essential; a magnified one can help with precision.
- Look Down Slightly: Tilt your head back a bit and look down into your mirror. This slight angle helps to slightly tauten your eyelid, making it easier to draw a smooth, uninterrupted line close to your lashes.
- Start with Small Strokes: Instead of trying to draw one continuous line, begin by making small, connected dashes or dots along your upper lash line. The goal is to get the color as close to the base of your lashes as possible. This method is much easier to control than one long stroke.
- Connect the Dots: Once you have your guiding dots or dashes in place, go back and gently connect them. You can fill in any tiny gaps to create a solid, seamless line.
- Build Up Gradually: You can always add more liner to thicken the line or deepen the color. It's much harder to fix a line that's too thick or uneven. If you make a mistake, don't panic. A Q-tip lightly dipped in micellar water or makeup remover can act as a precise eraser.
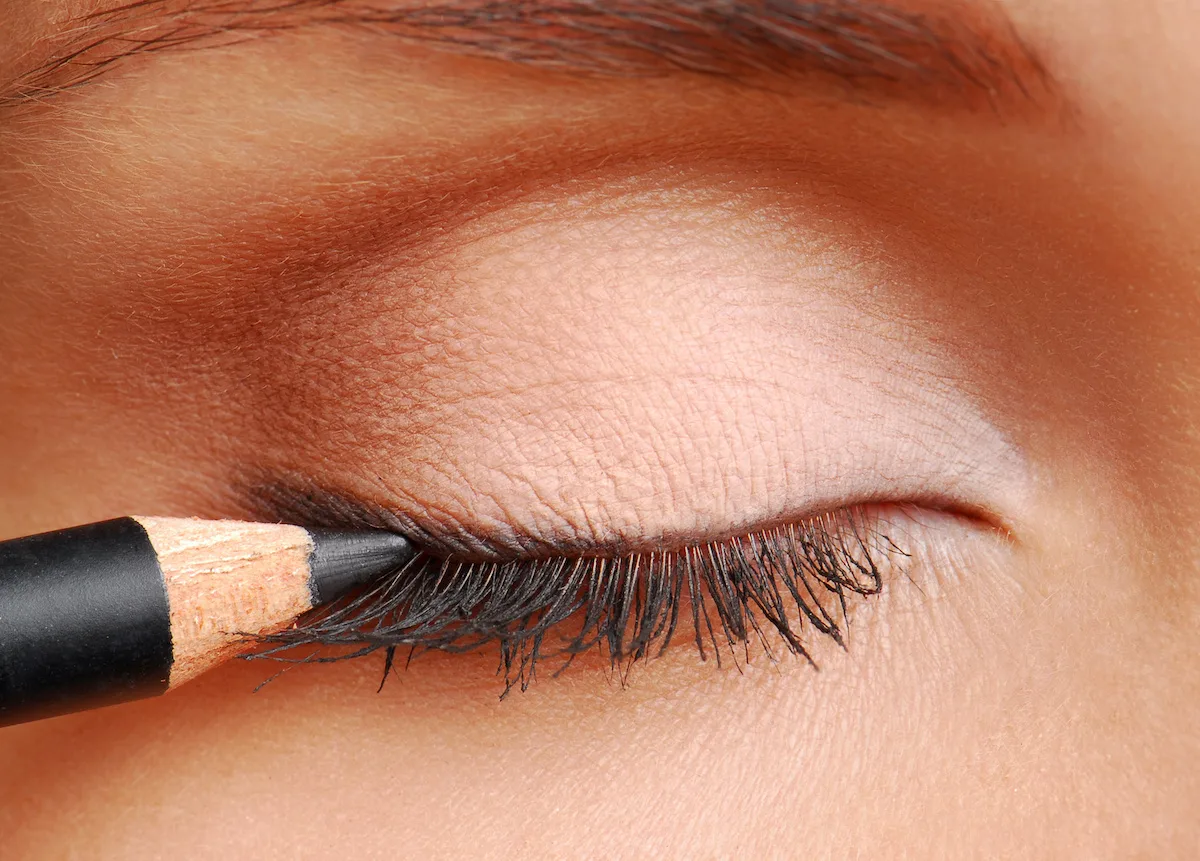
Image source: Bing (Web (fair-use with source credit))
Mastering the Wing: A Little Trick
Ah, the winged liner. It looks so chic and polished, but it can feel like advanced sorcery. The key to a successful wing isn't just skill; it's about using the right technique and having a bit of patience.
Most winged liner tutorials focus on visual cues that are essential for success.
- The "Dot and Connect" Method: Instead of trying to freehand a triangle, start by placing a tiny dot where you want the tip of your wing to end. Then, draw a line from the outer corner of your eye up to that dot. Next, draw a line from the tip of that wing down to meet the middle of your upper lash line, creating a triangle. Finally, fill in the entire shape. This visual guide makes it much easier to achieve symmetry.
- Angle is Everything: A good starting point for the wing's angle is to imagine extending the natural line of your lower lash line upwards. This often creates a balanced and flattering look.
- Use Tape as a Guide (No Shame!): If you're really struggling with freehanding, a small piece of medical tape or even a business card can provide a crisp edge. Place it at your desired angle, press it down firmly to ensure no product seeps underneath, and then draw your line along its edge. Peel it off carefully for a sharp, clean wing. This is a common trick shared in makeup artist communities.
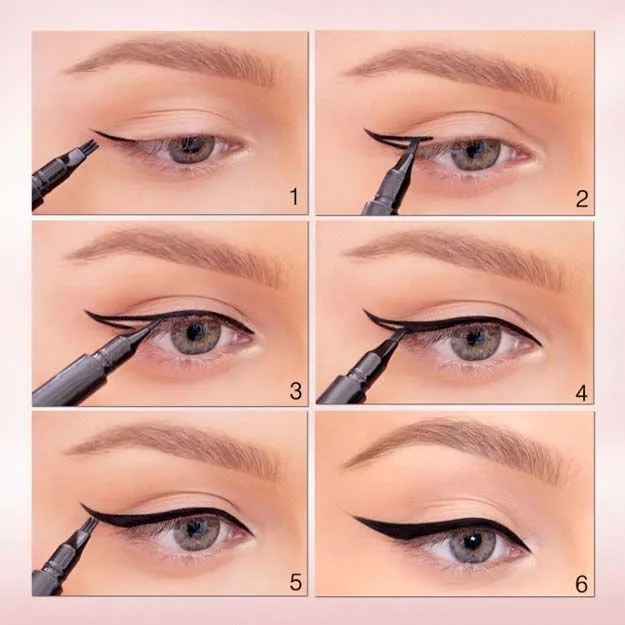
Image source: Bing (Web (fair-use with source credit))
Mistakes to Avoid When Applying Eyeliner
Even with the best intentions, some common pitfalls can turn your eyeliner attempt into a frustrating experience. Recognizing these mistakes is half the battle, allowing you to correct them and improve your technique. Our analysis of user feedback highlights recurring issues that impact the final look and wear-time.
- Skipping Eyelid Prep: As mentioned, applying liner to oily or unprimed lids is a recipe for smudging. Without a good base, your liner has nothing to grip and will slide off, especially in warmer weather or if you have naturally oily skin.
- Pulling Your Eyelid Too Hard: While you want a taut surface for application, over-stretching your eyelid skin can distort the line you're drawing. When you release your skin, the line can end up looking wavy or uneven. Gentle stabilization is better than forceful pulling.
- Trying to Draw One Long Line: For most people, attempting a single, unbroken line from inner to outer corner is incredibly difficult and often results in a shaky, uneven appearance. Breaking it down into smaller, manageable strokes is far more effective.
- Ignoring Symmetry: It's rare for eyes to be perfectly symmetrical, but a drastically uneven wing or line can throw off your whole look. Take a moment to compare both eyes and make small adjustments to achieve balance. Many find using a ruler or measuring tape to check angles helps, though this is an extreme measure.
- Using the Wrong Tool for the Job: Trying to get a sharp wing with a smudgy pencil, or a soft smoky eye with a stiff liquid liner, is a common mistake. Each product type excels at different finishes, so match your tool to your desired outcome. For instance, achieving a true "cat eye" often requires a liquid or gel liner.